Usually you need to remove the drum from the washing machine if you intend to repair it from the inside or disassemble it completely when it is hopelessly broken. At the same time, you want to remove the drum without damage in order to make something useful out of it.
It’s great if you call the master for this painstaking work, but, armed with our step-by-step instructions, you can get the drum yourself.

What do you need to pull out the drum
Before starting the disassembly, it is worth preparing the tools. Almost everything that is listed below is in stock at any home craftsman:
- screwdrivers of various types;
- pliers;
- spanners;
- a hammer;
- saw-hacksaw (for non-separable drum).
If you find everything you need, you can get to work.

Dismantling the washing machine
In order not to miss anything (especially if you are engaged in repairs and plan to assemble the machine back), proceed sequentially. Follow the instructions:
- Remove the cover. To do this, using a Phillips screwdriver, unscrew the screws that hold the panel - usually there are two, and they are located behind the case. The lid is removed with a slight push from itself and up.

- Remove the control unit. To do this, unscrew all the fasteners that hold it on the SMA housing. You will find some screws under the powder receptacle, so remove it first.
When the button unit is connected to the SM case with just one wiring, carefully place it on the case or hang it on the service hook (not available on all machine models). You can disconnect the wiring by pre-marking all the contacts or by photographing their connections.
- Remove the bottom panel behind which the drain filter is hidden. In most models (Ariston, Indesit, Samsung and others), it rests on plastic latches.

- For access to the front panel, insert a sealant into the drum. To do this, first remove the wire or plastic clamp, picking it up with a screwdriver, after which you can bend the edges of the gum inward.

- Remove the front wall by unscrewing the screws behind the previously removed panels - bottom and front. Lift it slightly and pull it towards you. Set aside.

- Separate contacts of the blocker or remove UBL completely.

- Now remove all parts that prevent the drum from being removed. All wires connecting the heater, engine, pump and sensors must be disconnected.

- Return again to the top of the machine - here you need to unscrew the fasteners holding the intake solenoid valve. Also tear off the nozzle supplying the dissolved washing powder from the cuvette to the CMA drum. These parts will be attached back during assembly, so remove them carefully.

- If you are disturbed by a pressure sensor, nozzles and wiring, remove them.

- Remove the counterweights. In most models, there are two of them, bolted at the top and bottom of the case.


Attention! Unscrew the “stones” carefully so as not to drop them on the leg or on the body of the machine.
- Carefully pull off the drain pipe, as well as the pressure switch tube, if you have not removed it earlier (you must unclip the clamps and pull the pipes towards you). Inspect the drain pipe at the same time - often it loosens and begins to let water through.

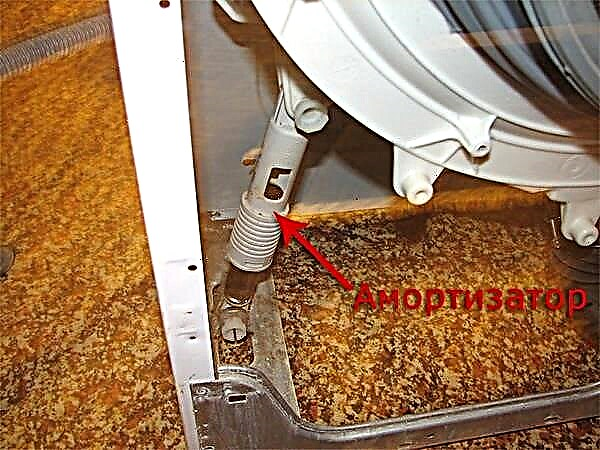
- Eliminate shock absorbers (dampers) and springs. Shock absorbers come first: pull out the mounts that hold the tank. The principle of removing the fasteners is the same for both shock absorbers. Removing the tank from the springs occurs last.


Important! It will not be very convenient to get the tank alone, so it will be nice to get the support of a friend - one of you will neutralize the springs, the second will hold and take out the tank. Caution! The tank is heavy, do not drop it.

- After taking out the tank with the motor, lay it so that the pulley remains at the top.
- Unscrew the engine by detaching the belt.
- After removing the electric motor, unscrew the shock absorbers that remain on the tank.
Attention! Remember that such a "major" disassembly of the washing machine is a chance to check the operability of all its parts. If you arm yourself with a tester, you can ring the entire electrician.
Even a visual inspection will be helpful. Take this opportunity to get the heater - it may have scum on it, and it requires cleaning or replacement.
The "dirty" work has already been done - it remains only to disassemble the tank and pull out the drum.
How to open the drum of a washing machine
Before opening the tank to gain access to the drum, find out the principle of its connection and the material from which it is made. Most often, the tanks are plastic, and open in one of the ways:
- Fixed tanks (for example, at Hotpoint Ariston) are sawn with a hacksaw or grinder. Sawing is carried out strictly along the seam of gluing. To assemble such a tank, then you will need to drill holes for the bolts and thoroughly process the halves with a moisture-proof sealant to ensure a reliable connection.

- Collapsible tanks open simply: to do this, unclench the staples that tightly compress the two parts of the plastic tank. The brackets are opened with a conventional slotted screwdriver.

Next, you have to disassemble the drum, or more precisely - removing it from the plastic "shackles" of a sawn or disassembled tank.
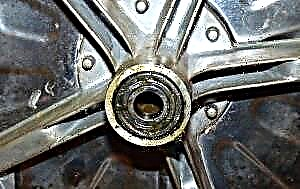
To open the drum, you need to remove the rest of the plastic from it - to do this, remove the pulley by unscrewing it with a wrench. Replace the bolt on which the pulley was held. Arm yourself with a hammer and, gently tapping the shaft, knock it out.

The work is over.
If your plans reassemble the CM, then check the bearings and lubrication of the seals. If necessary, replace the grease, oil seals or the bearings themselves. About how to replace bearings in an LG or Bosch washing machine, we wrote earlier.
If you removed the drum from a non-working machine, you can make a barbecue or smokehouse out of it yourself.